
Bella@fvwin.com
+86-15999819066
When choosing a metal push button switch for a custom control panel, size and appearance are not the only things to consider. The switch must also fit the panel thickness, rear space, mounting structure, and electrical requirements.
A switch may fit the front panel but still have problems during installation. For example, the mounting nut, terminals, or wires may not have enough space behind the panel.
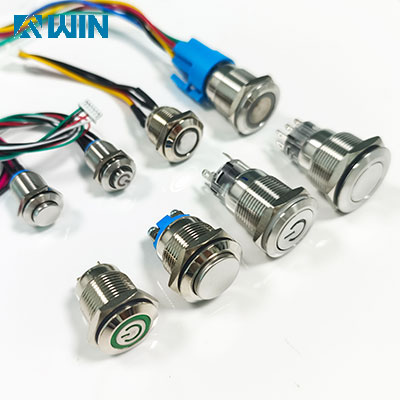
Before ordering, check the following points.
1. Check the Panel Cut-Out Size
The cut-out size is one of the first things to confirm. Common metal push button switch sizes include 12mm, 16mm, 19mm, 22mm, 25mm, 30mm and 40mm.
Keep in mind that the button head diameter and mounting hole diameter are not always the same. The cut-out size refers to the hole needed to install the switch body.
| Check the panel drawing and match the hole size with the switch specifications. | 1. 12mm metal push button switch: Suitable for small control panels and compact equipment. 2. 16mm metal push button switch: Commonly used in small equipment control panels. 3. 19mm metal push button switch: Suitable for different panel control applications. 4. 22mm metal push button switch: Often used in industrial control panels and machinery. Also check the thread size and mounting tolerances. The mounting hole must match the manufacturer's drawing to ensure proper installation. |
2. Check Panel Thickness and Mounting
Panel thickness affects how the switch is fixed in place.
Most panel-mounted metal push button switches have a threaded body, mounting nut, and gasket. The nut holds the switch in place, while the gasket helps seal the gap between the switch and panel.
If the panel is too thick, there may not be enough thread for the nut. If it is too thin, an extra washer or spacer may be needed.
| Before ordering, confirm: | 1. Panel thickness 2. Threaded body length 3. Available thread length 4. Gasket thickness and position 5. Required mounting accessories Always check the manufacturer's drawing. This is especially important for panels made of stainless steel, aluminum, or coated metal. |
3. Check the Space Behind the Panel
A metal push button switch may fit the mounting hole but still need more space at the rear.
The terminals, contact block, and connected wires can interfere with nearby parts. This is a common issue in compact control panels.
| Check the following before fixing the panel layout: | 1. Terminal position: Check whether the terminals face straight backward or at an angle. 2. Wiring space: Leave enough room for solder terminals, screw terminals, or pre-wired cables. Avoid forcing wires into tight bends. 3. Nearby components: Make sure the switch does not interfere with relays, cable ducts, circuit boards, or other switches. 4. Maintenance access: Leave enough room for wiring, inspection, and future replacement. For compact equipment, check the full rear dimensions of the switch, not just the front mounting size. |
4. Check IP Protection After Installation
IP65 and IP67 are common ratings for metal push button switches. However, the switch rating does not automatically apply to the complete control panel.
The seal between the switch and panel is also important.
A gasket is usually fitted between the switch housing and panel. It helps keep water and dust out of the mounting hole.
To maintain a good seal:
Clean the panel opening: Remove burrs, sharp edges, and metal debris.
Fit the gasket correctly: Make sure it is not twisted, damaged, or out of position.
Tighten the mounting nut evenly: Follow the manufacturer's recommended torque. Over-tightening may damage the gasket or mounting parts.
Check the panel surface: Paint, coatings, and uneven surfaces may affect the seal.
For applications that need IP protection, check the switch test conditions and follow the installation instructions. The finished panel may need its own protection test.
5. Confirm the Contact Type and Electrical Ratings
The switch must also match the control circuit. Check the contact type and electrical ratings before ordering.
Contact Configuration | Common contact options include: 1. 1NO (Normally Open): The circuit closes when the button is pressed. 2. 1NC (Normally Closed): The circuit opens when the button is pressed. 3. 1NO + 1NC: Provides one normally open contact and one normally closed contact. 4. 2NO or 2NC: Provides two normally open or two normally closed contacts, depending on the model. Choose the contact type according to the equipment's wiring and control requirements. |
Momentary or Latching Operation | There are two common operating types: 1. Momentary: The button returns to its original position when released. It is often used for start, reset, and temporary control signals. 2. Latching: The switch stays in its switched position after being pressed. It is used when the ON/OFF state needs to remain unchanged until the next operation. Confirm the required operation type before placing an order. |
Electrical Ratings | Check these specifications against the actual circuit: 1. Rated voltage (AC or DC) 2. Rated current 3. Contact configuration 4. Contact material 5. Electrical life 6. Switching load 7. LED voltage Pay attention to AC and DC ratings. The allowable current may be different for the same switch at different voltages and loads. Select the switch based on the actual load, not only the power supply voltage. |
6. Prepare the Specifications Before Ordering
A clear specification list helps the supplier check whether the switch fits the panel and electrical system.
| Cut-Out Size | 12mm / 16mm / 19mm / 22mm / 25mm / 30mm / 40mm | Panel Thickness | Actual thickness in mm |
| Head Style | Flat / Raised / High / Dome | Housing Material | Stainless Steel / Other |
| Operation Type | Momentary / Latching | Contact Configuration | 1NO / 1NC / 1NO+1NC |
| IP Rating | IP65 / IP67 / Other | Terminal Type | Solder Pin / Screw Terminal / Wire |
| LED Option | No LED / Ring LED / Dot LED | Rear Clearance | Available space for installation and wiring |
If you have a panel drawing, send it to the supplier along with the switch requirements. This makes it easier to check the mounting size and rear space before ordering samples.
Choosing a metal push button switch for a custom panel involves more than checking the button size. Panel thickness, mounting dimensions, rear space, sealing, and electrical requirements also need to be considered.
Checking these details before ordering can help reduce installation problems, wiring changes, and replacement costs.
FVWIN offers metal push button switches in 12mm, 16mm, 19mm, and 22mm mounting sizes. Different head styles, contact configurations, operating types, and LED options are available.
If you are developing a custom control panel, you can send FVWIN your panel drawing and electrical requirements for product selection.
Contact: Ms Bella
Phone: +86-15999819066
Tel: +86-0769-89615395
Email: Bella@fvwin.com
Add: No 25, Xinfeng East Road, Shijie Town, Dongguan, GD, CN, 523000
We chat